The Smart Alerts engine monitors a selected data point over time, updating each time data is refreshed or according to the alert’s scheduled frequency. Historical values are analyzed using time series machine learning algorithms to generate a forecast of expected future values. If new data points fall significantly outside the defined tolerance range, the system triggers an alert, notifying the user of a potential anomaly.
Smart Alerts cannot operate until sufficient data has been accumulated for the projection. This is typically around 6-12 data points.
Tip: Alerts can be configured in Discover and in Present at runtime.
The Alerts feature is available with Enterprise licensing only. Smart Alerts is licensed separately.
Building an Alert
Before you begin
Alerts can only be configured for saved discoveries, so start by saving your visual. If your visual includes unsaved changes, the Build New Alert option will be disabled on the right-click menu.
Setting up Smart Alerts
- Right-click the relevant data point (that is, a grid cell, a chart column, and so on) to open the context menu.
- From the context menu, open the Build New Alert submenu and choose Use Smart Alert.
- Configure the alert from the Alert dialog (continue reading to learn how).
Tip: To build an alert for multiple cells in the query, you can use the selection or lasso tool to select the relevant cells, and then right-click the selection to open the context menu.
If you don't want to create a Smart Alert and actually want to receive a Basic Alert (notifying you when the value of the given data point is up, the same, or down), see Alerts Builder in Discover.

You can see information about alerts from the Bulletin Board and the Alerts Feed.
Alert dialog (Smart Alerts)
Open the context menu on the relevant data point or points and select Build New Alert > Use Smart Alert to open the Alert dialog:
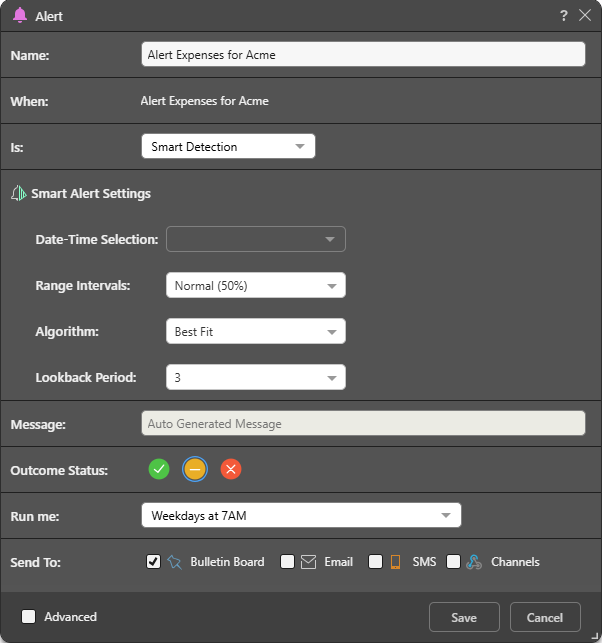
Common Fields
- Name: Name your alert; by default, it is named according to the members in the given data point.
- When: Displays the given data point for which an alert will be triggered.
- Is: This dropdown list provides a simple way to set up the alert logic trigger based on your selected data points. Because you selected Use Smart Alerts, this defaults to Smart Detection. For details about the other options, see Alerts Builder in Discover.
Smart Alert Settings
Smart Alerts allow you to monitor specific data points and receive alerts when actual values deviate from a predicted range. The system generates a forecast using the selected algorithm and then compares new data against the forecast range. If the actual values fall outside of the allowed range, an alert is triggered.
Date-Time Selection
The forecast is generated based on this time series selection, and new data points will be evaluated against it. For example, selecting a shipping date means the system will track changes over time using that date, triggering alerts when actual values deviate from the forecast range.
Range Intervals
Range intervals define the "tolerance level" for triggering the alert. The system predicts future values using the chosen algorithm and sets an expected range. If an actual data point falls outside of this range, an alert is generated. A narrower interval will make the alert system more sensitive to small variations, while a wider interval will allow for more fluctuation before an alert is triggered.
Algorithm
The forecasting algorithm to use. You can choose any forecasting model used in Pyramid. Choose Best Fit to find the best solution across all algorithms.
Lookback Period
The lookback period defines how many past data points the system should consider when generating the forecast data. A shorter lookback period makes the forecast more reactive to recent trends, while a longer lookback period smooths out fluctuations and provides a broader historical context.
Alerting Details
- Message: Fixed value. The message is auto-generated for Smart Alerts.
- Outcome Status: The alert outcome that should be shown when the alert runs. The icon does not indicate if the alert was successful or not. For example, an alert that measures things that produce "good news," should have the green outcome icon - so when the user gets the message, they see that there is good news.
- Run me: When to run the alert. You should either select a preset schedule from this dropdown list or select Advanced from the bottom-left corner of the dialog to configure an advanced alert.
- Send To: Choose where you want to receive the alerts. This can be one of Bulletin Board, email, SMS, or channel Webhook. Note that email and SMS can only be selected if messaging is enabled from the Admin console. The basic alert builder allows you to send alerts to yourself only. If you want to distribute the alert to other users, configure an advanced alert.
One of the preset options is On Demand. You can use on demand scheduling to trigger the alert to run whenever the underlying data model is reprocessed. Important: You must also configure on demand subscriptions for the relevant data models via the Master Flow or APIs.
Advanced
If you want to configure an Advanced Alert, you should select the Advanced checkbox in the bottom-left of the dialog.
Note: This is not available with the Community edition.
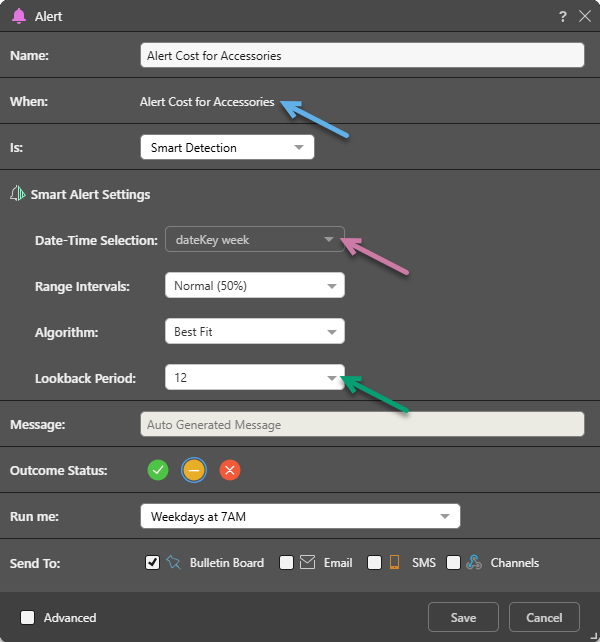
Example
If you create a Smart Alert with the following properties, the Smart Alerts engine will:
- Get the last 12 weeks Cost data for Accessories.
- The Cost / Accessories data is selected in the visual and is reflected in the When field (blue arrow below).
- The Lookback Period (green) and Date-Time selection (purple) indicate that 12 data points should be used for the forecast, and that the time series is weekly.
- Create a forecast with that data, using the Best Fit algorithm and with a tolerance as specified by the Range interval.
- When the alert schedule runs, if it finds one of the following is true:
- There is data related to a new date.
- The current data has changed.
The alert runs and, if the new data falls outside of the tolerance bounds, triggers the alert. In this case, sending an Auto Generated Message to the Bulletin Board.
Managing Alerts
Once an alert has been created, it can be managed from the content manager, through the related content item's Action Panel.
- Click here for more on the Alert Manager tools in the content manager.
Related information
Data Source Authentication
If you’re using Windows Authentication or SAP Logon Tickets to connect to your data source, you may be prompted to enter Authentication credentials when saving your changes.
- Click here to learn more about Data Source Authentication.